Monday, September 24, 2012

Clean Eating

Recently I've been trying out "Clean Eating." Clean eating simply means that you eliminate all processed food from your diet. The first question I had when I looked into this was "what constitutes a processed food?" Andrew Wilder at www.eatingrules.com says, "Unprocessed food is any food that could be made by a person with reasonable skill in a home kitchen with whole-food ingredients."  He calls it "The Kitchen Test".  If you pick up an item with a label and find an ingredient that you would never use in your kitchen and couldn't possible make yourself, then it's processed. (Obviously if it doesn't have a label, then it's probably unprocessed, ie. fruits and veggies)


Derek and I have been eating about 85% clean for about 2 weeks now. Recently I signed a pledge to do October Unprocessed (see my badge to the right of the page).  This is a pledge via eatingrules.com to eat only unprocessed food during the month of October.  I think it's going to be a great way to hold us accountable to a new way of eating and I'm already stockpiling recipes!

I figure, God put a bunch of delicious food on this earth for us to enjoy. Why would I want to eat something that contains sodium hexametaphosphate (try to say THAT three times fast!) or potassium sorbate?

A great resource I've found for meal ideas is 100 Days of Real Food. Lisa Leake took her family on a pledge to eat real food for 100 days. Check out her website www.100daysofrealfood.com or like her on Facebook! She has pre-planned weekly menus with links to recipes. She makes it so simple and her recipes are delicious! Following her has been a real eye-opener for me and she's truly an inspiration.

All that being said I have a fantastic recipe to share with you today! A few weeks ago I tried making whole wheat pizza crusts. Since then it's become our Friday night meal. The kids LOVE it, the husband LOVES it, and we all end up eating a healthy meal!

This crust is amazing. It's comes out of the oven crunchy and sweet, with just a hint of Italian spices.


Now this recipe is not 100% clean. It does have 1 cup of white flour in it which is not considered clean. I'm going to try all whole wheat flour next time we make it so I'll be sure to update this post to let you know how it turns out!

Start by adding together your dry ingredients: 1 cup of all-purpose flour, 1 1/2 cups whole wheat flour, 1 teaspoon salt, 1/2 teaspoon garlic powder, and 1 teaspoon italian seasoning.


Add to this your wet ingredients:  2 teaspoons of honey, and 2 teaspoons olive oil.

Next you'll want to combine 1 (1/4 ounce) package of fast rising yeast with 1 cup of warm water.  Mix until the yeast is completely dissolved.


Add the yeast mixture to the other ingredients and mix using the dough hook attachment on your blender (if you don't have a dough hook attachment, you could probably just mix with your hands).
Once the ingredients are combined, kneed the dough with your hands until it forms a ball. If your dough is sticky, add more whole wheat flour a tablespoon at a time. I also like to flour my countertop before I put the dough down to keep it from sticking!


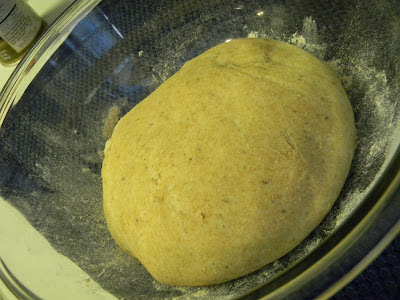
Let the dough rest for 30 minutes.  This gives the yeast a chance to do it's thing. After the 30 minutes you'll have a nice spongy dough to work with!

(Before...)
(...after)

Now here's the fun part - actually forming the crust! You can make the crust as thick or as thin as you like.  Because the kids like different toppings than the adults, I usually break the ball into two pieces and then make two fairly thin crusts. Totally up to you!

Roll the dough ball out using a rolling pin. Once you get it into a circular shape you can pick it up and let gravity help stretch it out to the appropriate size.  I like to grab it by the edge and work my hands around the edge of the circle, allowing it to stretch down. I'll admit, I tried throwing it like a true Italian but this was not a good idea. I wouldn't recommend it!

Lay your crust on a pizza stone or tray and bake in a 450 degree oven for about 5-6 minutes. 

(Before...)

Take the crust out of the oven and pop any bubbles that have formed with a sharp knife (you may need to press the steam out).  

(...after)

Now it's time to add toppings!! Here's where you can be SUPER creative! We like a simple pizza with mozzarella, roma tomatoes, fresh basil, and pepperoni. 


Arrange your toppings on your crust and pop it back into the oven for 8-10 minutes.

(Before...)

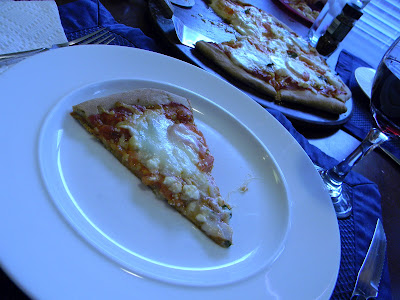
(...after!!!)

I honestly believe that after trying this crust I will never go back to takeout! It's delicious AND healthy which in my book is a winning combination!


I think next time we'll try a BBQ chicken pizza! I, personally, can't WAIT until the next pizza night!

What are your favorite pizza toppings?


Whole Wheat Pizza Crust
  • 1 (1/4 ounce) package fast rising yeast
  • 1 cup warm water
  • 1 1/2 cups whole wheat flour
  • 1 cup all-purpose flour
  • 1 teaspoon salt
  • 1/2 teaspoon garlic powder
  • 1 teaspoon italian seasoning
  • 2 teaspoons olive oil
  • 2 teaspoons honey

1.  Combine flours, salt, garlic powder, italian seasoning, olive oil and honey in a mixing bowl.  
2.  In a small bowl, add warm water to the yeast and stir until yeast is completely dissolved.
3.  Add the yeast mixture to the other ingredients and mix using the dough hook attachment.
4.  Knead the dough until it forms a ball, adding additional flour if the dough is too sticky.
5.  Let the dough rest for 30 minutes.
6.  Roll dough into the desired crust thickness.
7.  Bake at 450 for 5 minutes.
8.  Add toppings and bake for an additional 8-10 minutes.

Tuesday, September 18, 2012

Organizational heaven!! (Plus a 15 minute workout)

Yesterday, I undertook a job that has been plaguing me for months.  I cleaned out our pantry (cue the scary music/horror movie screams).  Our pantry had become a wasteland of half-used ingredients from long ago, cereal boxes with about a tablespoon of cereal left in them, and random spices mingled throughout.  It. Was. A.  MESS!!!

Now, I wish I had taken a photo of the pantry before I cleaned it out.  But honestly, I hadn't planned to share this job with you all.  I was just so happy with the way it turned out that I had to at least share the "after" pictures.


I had been pinning various ideas on Pintrest for a few weeks.


Baskets, canisters, and labels, oh MY!  I decided to try the Dollar Store first for some organizational materials.  I found some plastic baskets, cute contact paper and labels all for under $15!

When I got home it was time to get to work. I tore everything out of the pantry. That's right. Everything.  My counters were littered with baking goods, boxes of cereal, about 8 canisters of bread crumbs (why?!?!), and more spices than I can say!

The next step was to get rid of the grimy old contact paper that was on the shelves.  This stuff was here when we moved in and I 'm actually embarrassed that it took me this long to get rid of it. Again, I didn't take a before picture but here is a scrap of it in one of our kitchen drawers:


Imagine this with spills of peanut butter, syrup, and cayenne pepper. Blech. Once this stuff was up I got out the cute contact paper I had found at the Dollar Store.  I realized almost immediately that I liked the clean white shelves that were hiding under the old contact paper so I just added strips of the new paper the the edges of the shelf to add some pattern.


After throwing away a LOT of stuff (processed food that we are not eating anymore, things that had expired/were about to expire, etc.), it was time to start loading stuff back in!  I used small baskets for all my spices and organized them according to when they are used ("baking" spices are all in one basket, the spices we use most in cooking like cumin, ginger, etc. are in one).  I also added baskets for bread, snacks, tea, and all my baking gear.


To keep everything organized (ie, so my husband will put things back in the right place) I made little tags for each basket.  I put a mailing label, colored black with a Sharpie, onto a cardboard shirt box and used white acrylic paint for the lettering. I then tied them onto the baskets with some sheer black ribbon I had on hand.

All in all I was really pleased with how it turned out!

Now because this was such a huge undertaking, I didn't make it to the gym yesterday.  I actually sent Derek with the kids so that I could finish cleaning up the giant mess I had made cleaning things out!  So yesterday was the perfect day to do my 15 minute "quick fix" workout!  I recently found 2 videos on Youtube that give me a great workout in just under 15 minutes.  The first one is a 10-minute circuit created by Andrea Orbeck.  You can see the video here.

The second is a 4 minute interval workout which uses the Tabata interval routine (also known at HIIT or High Intensity Interval Training).  This video can be viewed here

I've never been a believer in 10 minute workouts or quick fixes.  I believe in putting the time in at the gym.  But when that's not possible, these two videos combined give you a great workout. And I think we can all agree that something is always better than nothing!

So the next time you're faced with a busy day (or an majorly gratifying organizational project!) try these workouts out for a quick, 15 minute fat-burning session!


What workouts do you like to do at home?

Thursday, September 13, 2012

A Pinwheel Birthday

My daughter loves Yo Gabba Gabba. I mean, LOVES IT! And she has a special place in her heart for Foofa. So when her 2nd birthday was coming up, it seemed natural to throw her a Yo Gabba Gabba party.

But I felt like it went against everything my inner crafter believed in to go with commercial party decorations bought at Party City. I just couldn't do it.

As I was perusing Evites I came across an adorable animated one with pinwheels. I had my inspiration!


I headed to Hobby Lobby to get materials for decorations.  Don't you just LOVE Hobby Lobby? I could drop so much money there if it weren't for the small amount of self control I have!  Luckily, scrap book paper was 50% off so I grabbed several sheets of coordinating patterns.

My goal was to make several pinwheels to put around the house and to make a Happy Birthday bunting to hang on the fire place.  


I was SO PLEASED with the way it all turned out.  The pinwheels were adorable and I couldn't have asked for more with the bunting.  And it was all pretty easy to make. Just a few nap times spent crafting (which, let's face it, is not a bad way to spend nap time!). 

I also put a centerpiece of pinwheels on the food table and hung a few from the window behind the table.


Since the party was in the afternoon I went with simple snacks for food. Veggies with onion dip,


a fruit rainbow,


Pink popcorn (stovetop popcorn drizzled with white chocolate - seriously delish!),


Edamame hummus, Whole grain pita chips, and my mom's deviled eggs. Oh, and of course pigs n' blankets!

We served wine and pink party punch which combined Sprite, cran-raspberry juice, and sorbet.  We chose a pomegranate/blueberry/acai sorbet...it was amazing!


Of course, I couldn't leave sweet Foofa out completely. So I made a Foofa cake using a heart shaped cake pan and craft foam.


Alice was delighted! And the cake was delicious! I made a yellow cake and used this recipe for a buttercream frosting which I found on Pintrest.  Really, REALLY good!

All in all the party was a huge success! Everyone had a great time and everything turned out exactly as I planned.  I couldn't have asked for more. And the best part? At one point I looked up and my husband had cleaned up all...the...mess. What a man!

(Grandma and Aunt MB enjoying the party)

(Papa having a piece of Foofa cake)

("the boys" playing Wii)

(Our sweet friends Aubri and Rhonda)

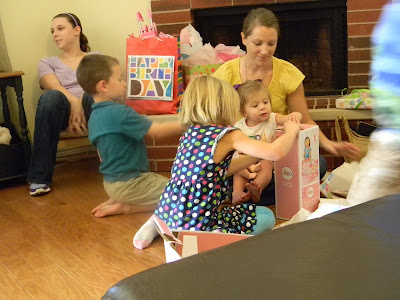
(The kids were digging into the gifts!)

(The sweet Birthday Girl!)

Happy Birthday to our sweet Ali-bird! 


Monday, September 3, 2012

Happy Labor Day!

Ah, Labor Day. The day when we do anything BUT labor! Today was just what I needed after the craziness of the past two weeks. Between my son's fifth birthday, and the beginning of school, things have been a little crazy around here!

Zach had a wonderful fifth birthday. We celebrated with a bunch of his friends at Going Bonkers which is a huge indoor play area. The kids had a blast (and the parents did, in fact, go bonkers)! Zach had requested a dinosaur birthday theme this year.  While I would have loved to go all out with dinosaur decorations, the decor of Going Bonkers only left me so many options. But we had a big T-Rex balloon and these amazing dinosaur cupcakes which I whipped up for the party.


The kids loved them and the best part was the everyone got to keep the little dinosaur toy on top!

Just a few days later it was time for Zach to start Kindergarten! He had a great first week of school. He loves his teacher and the kids in his class. It's so great to see him going off on his own like this! So grown up! Here he is posing on the first day:


So last week was all about adjusting to everyone's new schedules. But we are finally settling in!

One thing I LOVE about Zach being in school again is the time it gives me for little projects around the house. I have a list of sewing projects, cleaning projects, organizational projects...you name it, that I've been wanting to try. This week, I decided to take advantage of Alice's nap time and whip out my Mom's sewing machine (which I have on loan!).  Since I didn't want to get too involved in a big project, I decided to make myself an arm band for my iPhone for workouts!  Usually when I am running or lifting, I stick my iPhone in the waistband of my pants.  Let's just say it's not ideal. The phone gets sweaty or even worse it starts to slide down my leg!  I figured before I ran out and spent twenty bucks on a band, I would try to make one with materials I already had on hand.  All I needed was an old t-shirt, a measuring tape, scissors, my pin cushion, and my sewing machine.


First, I measured my arm where the band would go.  


Then I measured the length of my iPhone.


I cut a piece from the old t-shirt with the width measuring the same as my arm and the height measuring twice the length of my iPhone.  


Since I used the hem of the shirt in my original cut, that end was already finished up! Next I sewed a small hem in the opposite end.  Once that was done, I folded the piece of fabric in half lengthwise (right sides together and raw edges meeting) and pinned the side.


I used my sewing machine to sew up that side.


Then I turned it right side out half way (so that the tube was folded in half).


And that was it! I slipped it on my arm, popped my iPhone into the "pocket" and I was ready to go!  


This project was so easy and it took me, maybe 15 minutes. I've had a chance to use this several times at the gym and it works like a charm! My iPhone stays secure on my arm and out of my way! 

If you want to try this little project, I would recommend using a t-shirt with a good amount of stretch left to it.  Otherwise, I think it would stretch out a bit and not be tight enough on your arm.

Since I have my mom's sewing machine on loan, I'll probably be posting plenty of sewing posts in the future! There are so many projects I want to try!

I hope that everyone had a fantastic Labor Day!