Sunday, February 3, 2013

My weight loss story

Well it's a new year and the gym is crowded! I remember last year, being annoyed with all the newcomers to the gym.  Feeling miffed when I couldn't find an open treadmill or the weights I needed. But I feel like this year, I'm seeing things differently.  Each time I see a new person at the gym (yes, I know the new from the regulars) I want to congratulate them. I want to encourage them. I want to show them the benefits of not just making a resolution, but sticking to it!

A year and a half ago, I came home from work and told the husband that I needed to join the gym. I spent most of my day either sitting in my car or at my desk and I was having back pain.  I knew I was out of shape and over weight and I thought that perhaps if I could fix those problems then some of my pain and discomfort would go away.

That afternoon we went to the gym and both got memberships.  We started out going together. I would do 30 minutes on the elliptical trainer (usually at level 1, while watching an episode of The Office) and then I'd be done.  After about a month I decided to try a class. My first class was a step class. I still remember it.  It was a Saturday morning and we were doing double step. The class was packed and I shared my two steps with another woman. I was totally out of my league but it was the most fun I had had in a long time. I knew I'd be coming back!  After step, I tried a body works class (an hour-long class that uses low weights and high reps). It was taught by the same instructor who taught the step class I had been to. She mentioned at the beginning of the class that she had a Facebook page and that she was going to be starting a "take the weight off challenge" for anyone who was interested.  All I could think was, "sign me up"!!!

Over the next few weeks, Kelly taught me how to count calories and how to balance what I put in my body with what my body expelled as energy.  She had me start a food journal to document every calorie I put in and every calorie I worked out. I attended her classes religiously and she worked us HARD! And yet, I still didn't loose any weight. In fact, I GAINED a few pounds! I was beyond frustrated and ready to throw in the towel.  But Kelly spoke words of encouragement to me and kept me on track.

Eventually Kelly took me out onto the weight floor and introduced me to a free weights program.  She showed me several different exercises to do for each muscle group (shoulders, chest, back, biceps, triceps, and legs) and for a few weeks she guided me through these workouts. It was so helpful to have someone to workout with.  Where before I was shy and timid about venturing out onto the weight floor (with, let's face it, all those beefy guys!!), now I felt confident. I actually felt like I knew what I was doing!

And then the weight started to come off. As I built up lean muscle, my body was suddenly better equipped to burn off the fat.  I started to see (and feel!) muscles I didn't even know were there. Before I knew it I was lifting heavier weights and trying out new exercises. I felt AMAZING!!!

I continued this way for almost a year. Yes. The weight didn't come off in a month. I didn't loose 10 pounds in 2 weeks. It came off slowly, but it came off for good! This wasn't a crash diet with quick results. This was a lifestyle change.

Then, back in August, I read an article about Clean Eating.  I thought I would give it a try and see how it would change the way we ate. I wasn't going into this with any expectations other than to try to improve the way we ate.  You can see my original post about clean eating here.

Since then I've been putting less processed food in my body, and more clean, fresh, organic fruits and vegetables.  And the great thing is that I no longer have to count calories! I know that what I'm putting in my body is good for me. Yes, I might eat a meal that is high in fat every now and then. But because of all the hard work I put in, my body is equipped to handle it.  And there are so many foods that used to be common to my diet that I literally can't eat anymore (that's a good thing)!

I couldn't be happier about the changes I've made to my body and my life.  I look and feel better than I have since high school.  I feel like I'm setting a good example for my children.  I feel sexy for my husband. These are all things that I didn't even know were missing! I've made a lifestyle change and know that the habits I've formed will stick with me for the rest of my life. THAT feels good!

And now, all I want to do is to pass the knowledge I've gained on to others.  I would like to eventually become certified as a personal trainer and perhaps even get a degree in nutrition.  I want to open peoples eyes to what they are putting in their bodies and prove to them that they can do things they never thought possible...just like I did!


The before picture here is from May of 2011, about a month before I decided it was time for a change!
The after shot if from April of 2012, right before I ran my first Warrior Dash!

Tuesday, December 11, 2012

Holiday Goodies

On Sunday, our church had its annual Market for Mission. It's a great event where handmade items, jewelry, and baked goods are sold to benefit our church's missions.
Each year Zach's Sunday school class sells baked goods. Since it was a crazy busy weekend for us, I decided the easiest thing to do would be to whip up some rice krispy treats. But no ordinary rice krispy treats would do! These needed to have holiday flair!
I decided to make White Chocolate Peppermint Rice Krispy Treats. Uh-huh. I had seen a pin on Pintrest that inspired these goodies.
And they were super easy! I made rice krispy treats as normal. With the marshmallows, I added 1/2 tsp of peppermint extract. Once the marshmallows were melted, I added the Rice Krispies as well as some Ghirardelli white chocolate chips and crushed up candy canes. Then I formed the treats as normal.
They were delish! In fact, Zach has insisted every day since that we make another batch. And I'm thinking that won't be the last batch we make this holiday season!

What's your favorite Christmas goody?

White Chocolate Peppermint Rice Krispy Treats:

4 tbls butter
6 cups marshmallows
1/2 tsp peppermint extract
6 cups Rice Krispies
1 cup white chocolate chips
Approx. 3 candy canes crushed

1. Melt butter in a large pot (I use my big soup pot).
2. Add the marshmallows and the peppermint extract and stir until the marshmallows are completely melted.
3. Add the Rice Krispies, chocolate chips, and candy canes and mix thoroughly.
4. Transfer the mixture to a 9x13 pan and, with greased hands, press the mixture into the pan.
5. Allow to cool and cut into squares


Thursday, December 6, 2012

Holiday Pinspiration

Well the holiday season is officially in full swing! I absolutely LOVE Christmas.  I love decorating the house with pine, hanging wreaths, and stringing lights on anything that will stand still long enough.  I love for the house to smell of cinnamon, vanilla and cedar.

And let me tell you, my Pintrest boards have been waiting for this time all year! All year I've been pinning ideas for holiday decorating, crafts to put around the house and, of course, for baked goodies!  Never before have I been so grateful to Pintrest.

I will fully admit that my holiday mantel is completely based on Pinspiration.  From the little cone trees to the hurricane filled with peppermint candies, I got it all from Pintrest.


These little cone trees seem to be popping up everywhere on Pintrest.  I've seen them made with scrapbook paper or with styrofoam cones.  I used poster board to make my cones and then used modge podge to cover them with Christmas tissue.


Once they were dry I sat them on top of the candle sticks that are usually on my mantle!  I LOVE the way they turned out!


I had a little poster board left over so I made this little star!


I basically drew a star (I traced a metal one we have hanging outside - we DO live in Texas, after all!), and then used the dull side of a butter knife to score lines from each point.  Once the lines were scored I shaped it and used modge podge to affix some gold tissue just like I did with the cone!

The final bit of Pinspiration came in the form of my glass hurricane.  Since Derek and I got married, this hurricane has sat on our mantle with a lame candle in it. Boring.  But lately I've been branching out with what I add as filler around a candle!  You can find all kinds of ideas out there:


I decided to add peppermint candies as a filler around a vanilla candle. I think its really pretty and it actually smells great too! And, of course the kids love it!


The wreath is one I got at Target back in 2005.  I would say I got my money's worth! I love the way it looks hanging on the mirror.


The whole thing comes together so nicely! I couldn't be happier!


And of course Zach and Alice's stockings are already hung by the chimney with care:


What Pinspitations have you added to your holiday decorating?


Thursday, November 1, 2012

Chicken Couscous

I've been pondering about my job a lot lately.  Being a full time mom is HARD, y'all!  I quit my job at the beginning of the year to stay home full time. Derek and I decided that with his travel schedule, it would be easier on everyone if I was home with the kids.  And really, it has made a HUGE difference in our lives.  Our stress level is much lower (I attribute it to the house always being clean - a clean house just makes you feel at peace!).  Plus I love that I can be there for the kids in ways I couldn't before.  I love volunteering at Zach's school and being able to be at every class party! I love those days when he comes home to a fresh batch of cookies (how June Cleaver of me, right?), and I love being able to provide healthier food for both him and Alice (because I have time to cook it!!).  I once told Derek that before I quit my job, I felt like I was doing two jobs at about 50%.  Now, I feel like I'm doing one job at 110%.  It's such a good feeling to be able to support my family in this way.

(warning - I am about to spout off things that every stay-at-home mom says)

But it's true what they say - it's the hardest job in the world.  My job is literally 24-7.  I mean, I do get a break...when I sleep. But even then, I wake up in the middle of the night and start making lists in my head of chores to do, errands to run, upcoming events. It really never ends.  Also, imagine if at the end of your work day, your boss came in and deleted every file that you worked on that day. That's what it feels like when you spend the day cleaning the house and within 20 minutes of everybody being home it's all destroyed.

All this to say that it's really easy to get burned out.  Moms really do need a break every now and then. So dads, take note. Every now and then, hand your wife a glass of wine and insist that she take a break. The other day, I was in a mood! I had had a particularly rough day, the house was a mess, the kids were being loud....and my husband put me in a time out. He handed me a big glass of red wine and sent me to my room.  I sat, listened to music, browsed Facebook. It was JUST what I needed.

And it's part of the reason I love the dish I'm sharing with you today!  I'll admit, I've made this dish a few times, but it's really become my husband's speciality.  When it's on the menu, it's assumed that he will be cooking that night.  And it's SO GOOD!! We literally have it once a week and we never get tired of it!


I think my favorite part about this meal is the pearl couscous.  Also called Israeli couscous, it's a plumper, chewier version of the couscous most people are accustomed to.

If I could find whole wheat pearl couscous, I would be all over that! But since there is no such thing at our neighborhood grocery store, we use this tri-color couscous:


This dish combines pearl couscous, chicken, chickpeas, and tomatoes with a plethora of spices like cinnamon, cumin, curry, and red cayenne pepper. 


We like to add a bit of chili paste as well to make it spicy! It's perfect for a cold winter night, but we love it in the summer, too!

Start by cutting your chicken into bite-sized pieces.  Salt and pepper well.


Cook the chicken in about 2 tbl oil until no longer pink.  Be sure not to over cook it as it will simmer once everything is added back together.  Remove the chicken and set aside, leaving the liquid in the pan. 

Add to this liquid your chopped onions and spices and cook just until they begin to turn translucent. 


Add to the onions 3/4 cup of chicken broth and the juice from the canned tomatoes (this usually comes to a total of 1 1/4 cup of liquid, which is what the cooking instructions for the couscous call for). Bring to a boil and add the couscous, chickpeas and tomatoes.


Cover and simmer for 8-10 minutes according to the couscous cooking instructions.

Once the couscous is tender, add the chicken back in (as well as a bit of cilantro). 


Let sit for 5-10 minutes to allow all the flavors to mingle.  If you like it hot, you can also add in some chili paste or Siracha at this point. YUM!


This dish is full of strong, Mediterranean flavors. The chicken is tender and the couscous is chewy. I love everything about it! 


And who can forget the chef extraordinaire??


Give this meal a try...soon! I promise you won't regret it!

What's your favorite way to relax after a particularly trying day?

Chicken Couscous (adapted from The South Beach Diet Quick and Easy Cookbook)
  • 1 lb chicken breasts cut into 1 inch cubes
  • 1 medium onion, chopped
  • 1/4 tsp cinnamon
  • 1/4 tsp curry
  • 1/2 tsp cumin
  • 1/4 tsp red cayenne pepper
  • 3/4 cup chicken broth + approx. 1/2 cup juice from canned tomatoes
  • 1 can tomatoes
  • 1 can chickpeas, rinse and drained
  • 1 cup pearl couscous
  • cilantro
  • chili paste (optional)

1.  Cook the chicken in approx. 2 tablespoons oil until no longer pink.  Remove from pan leaving any liquid.

2.  Add chopped onion to pan as well as the cinnamon, curry, cumin, and red pepper.  Cook until onions are just turning translucent.

3.  Add the chicken broth and juice from tomatoes and bring to a boil.

4.  Add the couscous, chickpeas, and tomatoes. Cover and simmer 8-10 minutes according to couscous cooking instructions.

5.  Once the couscous is fully cooked add chicken back in as well as a bit of cilantro and chili paste if desired.  Simmer for 5-10 minutes.

6. Serve hot with additional cilantro for a garnish.


Wednesday, October 10, 2012

Halloween Craft Time!

I can NOT believe it is already time to be getting out Halloween decorations! Where has this year gone?!?! Believe it or not, mid-October is upon us and it's about time to start pulling out pumpkins, ghosts, and spiderwebs!  

I made this wreath a few years ago and am so pleased that it's held up and still has a special place on our front door this time of year.


 For the life of me I can't remember where I got the idea for this wreath. I feel like it was from some variation of Martha Stewart media (her website, maybe?) but when I tried to find it, I couldn't.

However, I DO remember how easy this was to put together. All you need is about 30 minutes and the following:
  • a foam wreath form
  • cardboard (I used a portion of a diaper box)
  • Polyfill
  • orange burlap (can be found at any craft store in the fabric section)
  • black felt
  • glue gun
  • florists wire or ribbon 
Have you seen this trick floating around on Pintrest? You take plumbing foam from Home Depot and make your own wreath form. It's MUCH cheaper than the foam wreath forms you can buy at Hobby Lobby.  I've also seen pins where people use pool noodles to make wreath forms...

Start by tracing your wreath form onto the cardboard.  Cut the circle out and place it on the back of your wreath making sure that the cardboard is not larger than the foam.  Hot glue the cardboard to the back of the foam.

Place a good amount of Polyfill in the center of the wreath.  You want it to mound up above the foam.  

Cut your burlap into three inch wide strips.  The length will depend on how big your wreath form is. Just make sure that the strips can wrap from one underside to the next.  

Start by hot gluing the end of one burlap strip to the underside of the wreath.  Wrap the burlap over the wreath making sure not to mash down the Polyfill too much.  Secure the other end of the strip to the underside of the wreath.

Continue to do this until the wreath is fully covered with no Polyfill or foam showing.  Be sure to secure the burlap in different directions to get a more natural look!

Then cut a Jack-o-lantern face out of your black felt.  You can make your Jack-o-lantern goofy or scary!  Secure the felt onto the face of the Jack-o-lantern using hot glue.  

Attach florist wire or ribbon to the top of the wreath for a hanger.  I simply threaded some ribbon under the top loop of burlap.  You could also attach the ribbon to the back with hot glue since the wreath isn't too heavy. 

Voilà! An adorable (or spooky!) Jack-o-lantern wreath! This thing has become a favorite in our house.  Every year, the kids get so excited when I pull it out.  It's as though it marks the beginning of the count down to Halloween!


Give this easy Halloween craft a try! And be sure to post a picture of your Jack-o-lantern in the comments!


Sunday, October 7, 2012

Unprocessed Update plus LEGS!!!

Well I made it through the first week of October Unprocessed and I feel pretty successful!  We had some delicious meals and I ate WAY more fruits and veggies than I normally do which alone makes this whole thing worth it!

More than anything, this week showed me that we (Derek and I) eat pretty well, but that the kids DON'T! This makes me feel terrible.  I need to be a better example for my children and put better food on their plates. And it needs to start now.  Lisa Leake at 100 Days of Real Food says that "kids eat processed food because parents give it to them" and MAN is she right! The thing is, you want to give your kids food that is fast. When they come into the kitchen complaining that they are hungry, you want to fix it as fast as possible (both because you love them AND because there is nothing worse than cooking something up with a whining 2-year-old hanging on your leg!).  So we buy instant EVERYTHING! Frozen pancakes that cook up in 45 seconds, bags of chips, fruit snacks, and juice boxes.  For a mom, quicker is always better.  But is it worth it?  What kind of eating habits are we helping our children develop?

And after a week I've found that getting your kids to eat the healthier stuff is HARD!! Way harder than getting the husband to do it! They are so used to the frozen pancakes and the fruit snacks that any change is tragic for them.  Earlier this week I made a huge batch of whole-wheat banana pancakes for the kids to have for breakfast instead of their regular frozen Eggos.  I put the whole batch in the fridge and toasted some up each morning. The first morning, you would have thought it was a fate worse than death. Zach bemoaned the loss of his precious Eggo pancake.  He turned his nose up at my home-made pancakes and only ate a few bites.  The next morning we tried again and he proclaimed that my pancaked we "delicious" and ate the whole thing in record time.  I think it's just a matter of getting them used to new foods.  

In the end it's a learning process and I'm glad we are taking this journey. It's really teaching me a lot about the way we eat and the possibilities for our diets.  If you'd like to try the challenge, check out Eating Rules.  You can pledge to do just a few days unprocessed or the rest of the month.  It's totally up to you!  If you decide to join in, let me know in the comments!

In other news I've got a 5k coming up in a few weeks.  Denton Parks and Rec has some great little races throughout the year. In July we ran the Liberty 5k and on October 20th we'll be running the Jack-o-Lantern Jog!   I love these races because they are small scale - just a few hundred people through one of our parks.  They're great!

(photo credit here)

That being said, it's time I start working on my 5k time! One of the best ways I've found to up my mile time is to strengthen my legs. Makes sense, right?  Stronger legs can run faster, longer!  Now I'll admit, legs are one of my least favorite muscle groups to work.  I find myself saying, "but it's HAAAAARD!!!" and my legs always hurt for a few days after. But I love the way my legs look so I keep at it!

Here is my leg routine:

Lunges - I grab the 30 pound barbell and lunge my way down the length of the gym.  I do two sets of 10 reps (where a lunge on the left leg and right leg equals 1 rep).

Squats -  you can do these with no added weight or add as much as you can stand, either with dumbells or a barbell. It's important to make sure your form is clean when doing squats.  Look here for a good description on how to properly do a squat.

Glute lifts - I like to do these on the glute lift machine but you can also do them on the floor.  Here's a video demonstration.

Calf raises - Pretty self explanitory, right? Again, I like to use the machine but you could also do these free standing.

I think the important thing, as with any exercise, is to make sure it's not easy.  If you can do those lunges and not be out of breath, you aren't working hard enough and should add more weight.  Use as much weight as you can without your form suffering.

Here's to great looking legs and faster race times!!!

Is anyone else running a race soon? What are some of your favorite races to run?

Monday, September 24, 2012

Clean Eating

Recently I've been trying out "Clean Eating." Clean eating simply means that you eliminate all processed food from your diet. The first question I had when I looked into this was "what constitutes a processed food?" Andrew Wilder at www.eatingrules.com says, "Unprocessed food is any food that could be made by a person with reasonable skill in a home kitchen with whole-food ingredients."  He calls it "The Kitchen Test".  If you pick up an item with a label and find an ingredient that you would never use in your kitchen and couldn't possible make yourself, then it's processed. (Obviously if it doesn't have a label, then it's probably unprocessed, ie. fruits and veggies)


Derek and I have been eating about 85% clean for about 2 weeks now. Recently I signed a pledge to do October Unprocessed (see my badge to the right of the page).  This is a pledge via eatingrules.com to eat only unprocessed food during the month of October.  I think it's going to be a great way to hold us accountable to a new way of eating and I'm already stockpiling recipes!

I figure, God put a bunch of delicious food on this earth for us to enjoy. Why would I want to eat something that contains sodium hexametaphosphate (try to say THAT three times fast!) or potassium sorbate?

A great resource I've found for meal ideas is 100 Days of Real Food. Lisa Leake took her family on a pledge to eat real food for 100 days. Check out her website www.100daysofrealfood.com or like her on Facebook! She has pre-planned weekly menus with links to recipes. She makes it so simple and her recipes are delicious! Following her has been a real eye-opener for me and she's truly an inspiration.

All that being said I have a fantastic recipe to share with you today! A few weeks ago I tried making whole wheat pizza crusts. Since then it's become our Friday night meal. The kids LOVE it, the husband LOVES it, and we all end up eating a healthy meal!

This crust is amazing. It's comes out of the oven crunchy and sweet, with just a hint of Italian spices.


Now this recipe is not 100% clean. It does have 1 cup of white flour in it which is not considered clean. I'm going to try all whole wheat flour next time we make it so I'll be sure to update this post to let you know how it turns out!

Start by adding together your dry ingredients: 1 cup of all-purpose flour, 1 1/2 cups whole wheat flour, 1 teaspoon salt, 1/2 teaspoon garlic powder, and 1 teaspoon italian seasoning.


Add to this your wet ingredients:  2 teaspoons of honey, and 2 teaspoons olive oil.

Next you'll want to combine 1 (1/4 ounce) package of fast rising yeast with 1 cup of warm water.  Mix until the yeast is completely dissolved.


Add the yeast mixture to the other ingredients and mix using the dough hook attachment on your blender (if you don't have a dough hook attachment, you could probably just mix with your hands).
Once the ingredients are combined, kneed the dough with your hands until it forms a ball. If your dough is sticky, add more whole wheat flour a tablespoon at a time. I also like to flour my countertop before I put the dough down to keep it from sticking!


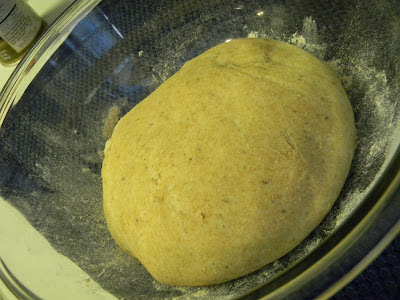
Let the dough rest for 30 minutes.  This gives the yeast a chance to do it's thing. After the 30 minutes you'll have a nice spongy dough to work with!

(Before...)
(...after)

Now here's the fun part - actually forming the crust! You can make the crust as thick or as thin as you like.  Because the kids like different toppings than the adults, I usually break the ball into two pieces and then make two fairly thin crusts. Totally up to you!

Roll the dough ball out using a rolling pin. Once you get it into a circular shape you can pick it up and let gravity help stretch it out to the appropriate size.  I like to grab it by the edge and work my hands around the edge of the circle, allowing it to stretch down. I'll admit, I tried throwing it like a true Italian but this was not a good idea. I wouldn't recommend it!

Lay your crust on a pizza stone or tray and bake in a 450 degree oven for about 5-6 minutes. 

(Before...)

Take the crust out of the oven and pop any bubbles that have formed with a sharp knife (you may need to press the steam out).  

(...after)

Now it's time to add toppings!! Here's where you can be SUPER creative! We like a simple pizza with mozzarella, roma tomatoes, fresh basil, and pepperoni. 


Arrange your toppings on your crust and pop it back into the oven for 8-10 minutes.

(Before...)

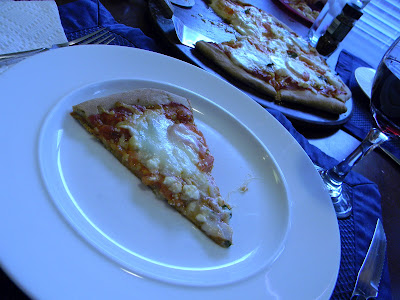
(...after!!!)

I honestly believe that after trying this crust I will never go back to takeout! It's delicious AND healthy which in my book is a winning combination!


I think next time we'll try a BBQ chicken pizza! I, personally, can't WAIT until the next pizza night!

What are your favorite pizza toppings?


Whole Wheat Pizza Crust
  • 1 (1/4 ounce) package fast rising yeast
  • 1 cup warm water
  • 1 1/2 cups whole wheat flour
  • 1 cup all-purpose flour
  • 1 teaspoon salt
  • 1/2 teaspoon garlic powder
  • 1 teaspoon italian seasoning
  • 2 teaspoons olive oil
  • 2 teaspoons honey

1.  Combine flours, salt, garlic powder, italian seasoning, olive oil and honey in a mixing bowl.  
2.  In a small bowl, add warm water to the yeast and stir until yeast is completely dissolved.
3.  Add the yeast mixture to the other ingredients and mix using the dough hook attachment.
4.  Knead the dough until it forms a ball, adding additional flour if the dough is too sticky.
5.  Let the dough rest for 30 minutes.
6.  Roll dough into the desired crust thickness.
7.  Bake at 450 for 5 minutes.
8.  Add toppings and bake for an additional 8-10 minutes.